Construction Plans for Two-Chamber Rocket Box*
Rocket boxes are designed to fit over a wooden 4 x 4-inch post, which serves as both the landing area and roosting surface. The section of post that fits inside the rocket box must not be chemically treated. An untreated, 16-foot or longer rough-cut post is recommended.
Two-chamber rocket boxes are simple to build, as they consist of two hollow boxes put together, one inside the other. The outer shell should be at least three feet tall, and the inner shell should be six inches longer than the outer shell. The exact heights are not important, but these minimum dimensions should be followed. You might consider making a taller box for additional roosting space and temperature diversity.
For this set of plans, the outer shell will be 3 feet tall, and the inner shell will be 3 ½ feet tall. Measure the outside dimensions of the 4 x 4-inch post before starting, as this will determine the other dimensions of the box.
Typically, the finished size of 4 x 4-inch posts is 3 ½ x 3 ½ inches, but not always. Although ½ - inch thick or thicker exterior plywood is acceptable, these plans specify 1-inch stock lumber (3/4-inch finished size) such as poplar, cedar, or pine.
Because maintaining 3/4-inch spacing is critical for the roosting chambers, you will need to adjust all dimensions accordingly if 3/4-inch finished size lumber is not used.
Materials List
Recommended Tools
Construction
- Measure and cut the boards for the inner shell. If your post is exactly 3 ½ x 3 ½ inches, cut two boards from 1-inch lumber (3/4-inch finished size), 5 inches wide by 42 inches long and two boards 6 ½ inches wide by 42 inches long. Roughen both sides of each board (or the smooth side if rough-sawn wood is used) with horizontal scratches or grooves (running side to side, NOT top to bottom), spaced 1/4 inch apart.
- Using a 1 ½-inch hole saw and drill, or jig saw, cut a hole (for bat passage between chambers), centered, about 16 inches from one end, in all four boards. Save the four cut-out pieces for spacer blocks. Smooth the edges of the hole to remove any splinters.
- Cut 12 additional spacer blocks from 3/4-inch finished lumber with a 1 ½-inch hole saw. Drill a 1/8-inch hole through the center of each spacer block, which will help prevent splitting and will aid in placing the spacers. Smooth any rough edges on the spacers.
- To each inner shell board, two spacer blocks will be attached using 2 ½-inch, coated deck screws (one screw per spacer). First, center the screws, one about ten inches from each end. Drive each screw until it just protrudes slightly through the board. Using the pre-drilled hole in each block, fit the spacer blocks over the screw tips. While holding the block in place, drive the screw until it protrudes just through the block. Do not drive the screws any farther. Save the remaining 8 spacer blocks for the outer shell.
- Using 1 5/8-inch coated deck screws and caulk, assemble the four inner shell boards into a hollow box as shown in Figure 2. The 5-inch boards will fit against the inside face of the 6 ½-inch boards, so that the hollow box is square. Spacers will face inwards.
- Slide the inner shell onto the 4 x 4 post. The bat passage holes will be towards the bottom. Position the top of the post and the top of the inner shell so they are flush. Secure the inner shell to the post by driving in all eight screws through the spacer blocks.
- Measure and cut the boards for the outer shell. If the post you have selected is exactly 3½ x 3½ inches, then cut one board 8 inches wide by 36 inches long (front), one board 8 inches wide by 38 inches long (back), and two boards 9 ½ inches wide by 38 inches long (sides) from 3/4-inch finished lumber. On both 9 ½ x 38-inch side pieces, make a mark on one edge 1 1/4 inches from the top. Draw a line from this mark to the top corner on the opposite edge and cut off this small piece (if rough-sided wood is used, make sure rough side will face inwards when assembled).
The sides will now be 36 3/4 inches tall on the front side and 38 inches tall on the back side. Bevel the top edge of the backboard 10 degrees to ensure a snug fit for the roof. Roughen all interior surfaces if necessary with horizontal scratches or grooves spaced 1/4 inch apart, or attach 1/4-inch plastic mesh with exterior grade staples to the inner side.
- Using a jig saw, cut a ½-inch tall by 7-inch wide slot (centered, from side to side) in one of
the 9 ½-inch wide boards, about 12 inches from one end. Repeat for the other 9 ½-inch wide
board. Smooth any rough edges.
- To all outer shell boards, attach two spacer blocks, one near each end. Center the blocks, about eight inches from the end. Repeat as in step 5 using 2-inch coated deck screws (do not drive the screws all the way in).
- Using 1 5/8-inch coated deck screws and caulk, assemble the four outer shell boards into a hollow box (see Figure 1 and Figure 2). The 9 ½-inch boards will be the sides (facing east and west), and the 8-inch wide boards will be the front and back.
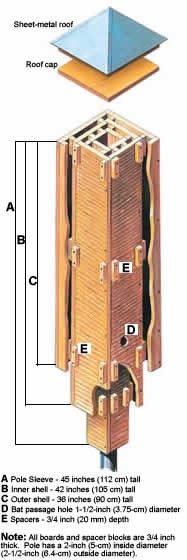
Fig. 1 - Exterior Cutaway View
|
Fig. 2 - Bottom View

Note: All boards and spacers are 3/4 inch thick.
|
* Plans Courtesy of:
Bat Conservation International
P0 Box 162603
Austin, TX 78716
(512) 327-9721
Illustrations Courtesy of:
Michael Poirier - Artist
and the Canadian Wildlife Federation
|
- Slide the finished outer shell over the inner shell, such that six inches of the inner shell protrude below the outer shell. Secure the outer shell to the inner shell by driving in all eight screws through the spacer blocks.
- To make the inner roof, cut an 8 by 8-inch piece of 1-inch lumber (3/4-inch finished size). Caulk all edges and attach the inner roof to the box with 1 5/8-inch coated deck screws. Carefully drive the screws into the top of the 4 x 4 post only. This will prevent screws from straying into the roosting chambers.
- Cut a 9 ½ 11-inch piece (from l x 10 inch lumber) for the outer roof. A wider roof (11 x 13 inches) can be used if you have the wood available. Longer overhangs can be used in warm climates. Caulking first, attach the outer roof to the box with 1 5/8-inch coated deck screws.
- Paint the exterior at least twice with a flat, exterior grade, latex paint or water-based stain. Cover the roof with tar paper and/or asphalt shingles for longer life and higher temperature diversity. Attach with 3/4-inch roofing nails, and seal each nail head with caulk or roof cement.
- Install bat house in an open, sunny area, near an unobstructed permanent water source such as a pond, lake, river, or stream. We suggest orienting the bat house so the vents face east and west [See Bat Box Location Recommendations]. Please report results to Bat Conservation International in the fall to help us evaluate this design. See address below.
Return to Bat Boxes
